Saturday, February 7, 2015

A Little Here. A Little There. Next Thing You Know, a Great Meal


Here at Potluck Paradise leftovers are our middle name.

We grew up watching our mothers take the last little bit of the Saturday roast beef, clamp the cast-iron food grinder on the edge of the kitchen table, and convert the un-chewable bits into tender minced meat. Next step--mix with leftover gravy, toss in some canned mushrooms and pour the mixture on a slice of white bread, or two.

If we were really lucky, there were leftover mashed potatoes. Those got mixed with an egg, or two, and some flour and formed into pancakes. Browned in butter to crispy doneness sheltering warm mash, they were the perfect base for the beef.

Flash ahead to today where from time to time we find ourselves looking at impossibly small bits of leftovers. A drib of soup, a drab of mixed vegetable. And, not having a dog, or even a cat, the thought can be, "Oh well. it's is just a little, let's toss it." I'm not going to lecture us on the amount of food wasted in the United States, or in other countries. We all know it is a serious problem.

But not so fast.  There are simple solutions if we just take a minute to consider proactively. That soup can help mellow a sauce or gravy. The vegetables can be frozen and tossed into the next batch of soup. And the last cup of chili is the perfect filling for an acorn squash!

So there's not real recipe this blog. Just a consideration.  Look at those leftovers and be thankful for the refrigerator with a large freezer so they can be set aside and, in effect, be harvested for another meal. Put the small bits into a special spot in the freezer so they are readily at hand. I have a large plastic food container in the door shelf and that's where the carefully labeled and securely wrapped bits are stored. Then think creatively. How can these be combined?  Even a mere tablespoon of mashed potatoes can be set aside to thicken a white sauce to creamy goodness. The last quarter of a cup of mashed sweet potatoes ended up in the chili above. Chili itself can be home for the last bits of the Saturday pot roast or the Sunday chicken.

In short, they're not leftovers, they're ingredients!

Copyright 2015 Rae Katherine Eighmey. All rights reserved.

Friday, February 6, 2015

Healthy, Fruit-Filled Chocolates Easily Made with Love and Honey


Sure the fancy heart-shaped boxes are nice, but why buy chocolates for your Valentine when you can make these delicious treats filled with healthful dried fruits and nuts. Here at Potluck Paradise headquarters, we're always ready to test chocolate recipes. These easy to make candies are at the top of our list. They taste like the richest bon-bons and no one will ever know the secret filling unless you spill the beans. The recipe dates from World War I when sugar was restricted to two tablespoons a day. Natural ingredients made these Honey Fruit Chocolates popular holiday gifts for Christmas 1917.

Make some for your special someone and watch him. . . or her. . . smile! The filling keeps frozen for weeks, ready to make a few more whenever you want a delicious little bite.

Honey Fruit Chocolates
1 12-ounce package raisins
1 8-ounce package whole, pitted dates
2/3 cup figs, diced
1 cup chopped walnuts or pecans
grated rind of half an orange
2 tablespoons orange juice
2 tablespoons honey
1/8 teaspoon salt
chocolate for dipping,
such as melted dark or semi-sweet chips
Run the fruit and nuts through an old-fashioned grinder, or pulse in
a food processor, until ground into a rough paste. Stir in rind, juice,
honey, and salt. Chill mixture until firm. Form into balls, about 3/4
inch in diameter. Melt chocolate chips and dip balls to enrobe
filling. Cool on waxed paper or foil. The filling can be frozen and
made into chocolates in batches. Makes about 6 dozen.
Copyright 2015 Rae Katherine Eighmey. All rights reserved

Thursday, February 5, 2015

Always Ready! with Rolls of Cookies in the Freezer


Here at Potluck Paradise headquarters we learned long ago--at our mother's apron strings-- that one of the keys to successfully surviving days with scores of children about is to have a freezer well stocked with rolls of slice and bake "icebox" cookies. Easy to make on demand by the handful, dozen, or cookie tin full for midnight snack, after school treat, or gift to a neighbor in need.

Our mothers and grandmothers knew how to make this work. Pick a day when you are in the kitchen anyway, cooking something that needs a constant eye, or in today's world, if there is something you want to watch on television and don't want to just sit there. Mix up and form the rolls. Wrap them securely--we've been using the "Press-n-seal" plastic wrap and then put them in s freezer bag. A small investment for a lot of easy pleasure.

If you have kids, or grandkids, around these are wonderful recipes to make with them.  I've cooked with our young grandsons. We all know how it goes. They can be all excited about the project, but after about five or ten minutes the lure of matchbox cars takes over. By dividing the project in half, you have the perfect project.  The Butterscotch in particular work with for making with kiddos -- Mix the dough with a spoon, or even with "perfectly clean" hands and then come back to it later.

Since we stared taking these to book talks we've found many a person had the same memories. And, they, like us, had not made these wonderful cookies in years. Post a picture of the Date Pinwheel and the "likes" will explode across Facebook. the chocolate spirals are fancy, but for flavor give me the Old Fashioned Butterscotch. We've shared that recipe in this community before but it is well worth repeating.


Classic 1950s Ice Box Cookies
(makes 8 dozen cookies -- but not all at the same time!)

2 cups brown sugar, firmly packed
1 cup melted butter
2 eggs, lightly beaten
1 teaspoon vanilla
1 teaspoon cream of tartar
1 teaspoon baking soda
4 cups flour
1 cup finely chopped walnuts or pecans (optional)

Stir the sugar, butter, eggs and vanilla together until completely blended. Add the dry ingredients, mixing thoroughly then stir in the nuts. Knead the dough with hands if necessary to get a smooth dough. Divide the dough into quarters. Form each roll into a log about one inch high and one inch wide. Wrap in plastic wrap and chill at least 2 hours in refrigerator. (You can firm dough more quickly in the freezer for about 20 minutes.)

When ready to bake, preheat oven to 375 degrees F. Grease baking sheets. Slice dough about one-eighth inch thick with a sharp knife. Place sliced on baking sheets, about 2 inches apart. Bake until lightly browned, about 10 to 12 minutes.  Makes 8 dozen -- but not, necessarily, at the same time.


Classic Date Pinwheels from the 1950s 

These Date Pinwheels can be a bit messy to make.  And be sure the dough is very, very cold when you slice them. But they are well worth the effort to have on hand in the freezer. If you want to be totally indulgent, frost them with a bit of burned butter icing--just a glaze.  Oh my!

Date-Filled Icebox Pinwheel Cookies

Filling:
1 pound pitted, dried,dates
1/2 cup white sugar
1/2 cup water

Cookie Dough
1 cup shortening or butter at room temperature
1 cup white sugar
1 cup brown sugar
3 eggs
1 teaspoon banilla
1 teaspoon baking soda
4 cups flour

First make the date filling. Cut the dates into small pieces. Combine with the sugar and water in a small saucepan and cook over medium heat, stirring occasionally, until the dates fall apart, making a jam-like mixture. (Note: if the dates are very dry, you might have to help them along with a few pulses from an immersion blender.) Set this mixture aside to cool while you make the dough.

In a large mixing bowl cream the butter and sugars. Stir in the vanilla and eggs, mixing well. Stir in the baking soda and flour.  To make the cookies--cover your work surface with waxed paper or plastic wrap. Divide the dough in half and roll out one half into a rectangle 1/4 inch thick. Carefully spread the half the cooled date jam over the cookie dough. Then, using the paper wrap as an aid, roll the dough up from the long side, making a spiral of date filling. Repeat with the other half of the dough and filling. Wrap this dough log in plastic wrap and chill for at least 2 hours. Store in the refrigerator for one week, or in the freezer for months.

When ready to bake, preheat the oven to 350 degrees F. Grease baking sheets. Cut across the roll in 1/4-inch thick slices with a very sharp knife. Place slices on the sheets and bake until golden brown, about 12 to 15 minutes.

Copyright 2105 Rae Katherine Eighmey. All rights reserved

Wednesday, February 4, 2015

Women's Heart Health Goes Red Deliciously


Hearts collide in February here at Potluck Paradise headquarters, No, we're not talking about lover's spats, we're celebrating the double-duty heart benefits of Valentine's Day celebrations and the American Heart Month promoting heart health especially among women. Well, what could be better to celebrate our Potluck Paradise National Potluck Month than a Red Dress -- Red Dinner. Although we're more likely to wear a red sweater and jeans.

Enough healthy red foods come to mind to easily fill a potluck table. Whole-wheat pasta tossed with tomatoes and red peppers, or in a red marinara sauce. Salmon is kind of red and then there is red snapper. We could even include some red meat -- a nice piece of lean steak -- smaller than a deck of cards, mind you -- with all the fat trimmed. Of course there are bushels of red vegetables! Tomatoes and red potatoes are too easy. What about red radishes in a non-fat dip, delicious red beets either simply roasted or slivered into a saucepan in the recipe below. Red cabbage is one our favorites. This recipe has all the flavor and hardly any fat. Just two tablespoons of butter for a whole head. 


WWI Victory Red Cabbage
4 cups thinly sliced red cabbage
2 tablespoons butter
1/2 teaspoon salt
1 tablespoon minced onion
1/16 teaspoon nutmeg
1/16 teaspoon cayenne pepper
2 tablespoons vinegar
1 1/2 teaspoons sugar
Soak the cabbage briefly in cold water. Melt the butter in a large frying pan. Add the onion and seasonings and cook until the onion is transparent, stirring frequently. Drain the cabbage and add to the frying pan carefully as the water clinging to the shreds will tend to spatter. Cover and cook over low heat until the cabbage is tender, about 10 to 15 minutes, stirring from time to time. Remove lid, add the vinegar and sugar, stir well and cook for 5 more minutes.

This is a quick and delicious way to prepare beets. It is a little messy to peel and then slice the raw beets. But the flavor is well worth it. Cooking time will vary depending on thickness of slices and how young, or old, the beets are. 
Luscious Steamed Red Beets
3 to 4 red beets
4 large lettuce leaves
grated peel from one orange
Peel the beets and slice very thinly on a vegetable slicer -- about 1/16 to 1/8 of an inch. Take a heavy bottomed 2-to 3-quart saucepan with a lid. Put about a half inch of water in the pan. Put in two lettuce leaves and then put in the beet slices, sprinkling them with orange rind as you fill the pot. Put remaining two lettuce leaves on top. Cook over low heat until the beets are tender, about 15 minutes. Watch carefully so that the water does not completely evaporate! You can eat or discard the lettuce.

And now for dessert!

We're skipping the red velvet cake or chocolate dipped strawberries and suggesting red pears with raspberry sorbet and maybe just a drizzle of dark chocolate. Use the pears just as they are, or poach in a light syrup. You could even use canned pears if you are in a rush. If you do use raw pears, toss them with a bit of lemon juice after you cut them so they don't turn brown as quickly.

Hearty Cornmeal Waffles Stretch Leftovers Deliciously


Here at Potluck Paradise headquarters getting the most from our food dollars is an essential. Good use of leftovers is key to that success.  Now anyone can toss the bits of meat and vegetables into a sauce, add some noodles as the "fill them up" starch and a buttered crumb topping and... Ta-DA -- casserole that elevates the humblest bits into a casserole fit for tasty mealtime--call it a hot dish if you live in Minnesota--but that's a saga for another time.

We've learned, however, that families thrive on variety. And not all meats, especially those with a distinctively tasty sauce do well combined with cream sauce.  A childhood memory got us thinking about new ways to combine leftover meats and a tasty starch. When we were kids our mothers sometimes brought the waffle iron into the dining room. Set it up on a tv tray and made waffles to order for dinner. We ate them the standard way with maple syrup and butter. Looking back, I suspect we did it at the end of the month when money was tight.

Recently, waffles and fried chicken have become a popular food combination on food shows, restaurants, and even some fast food places.

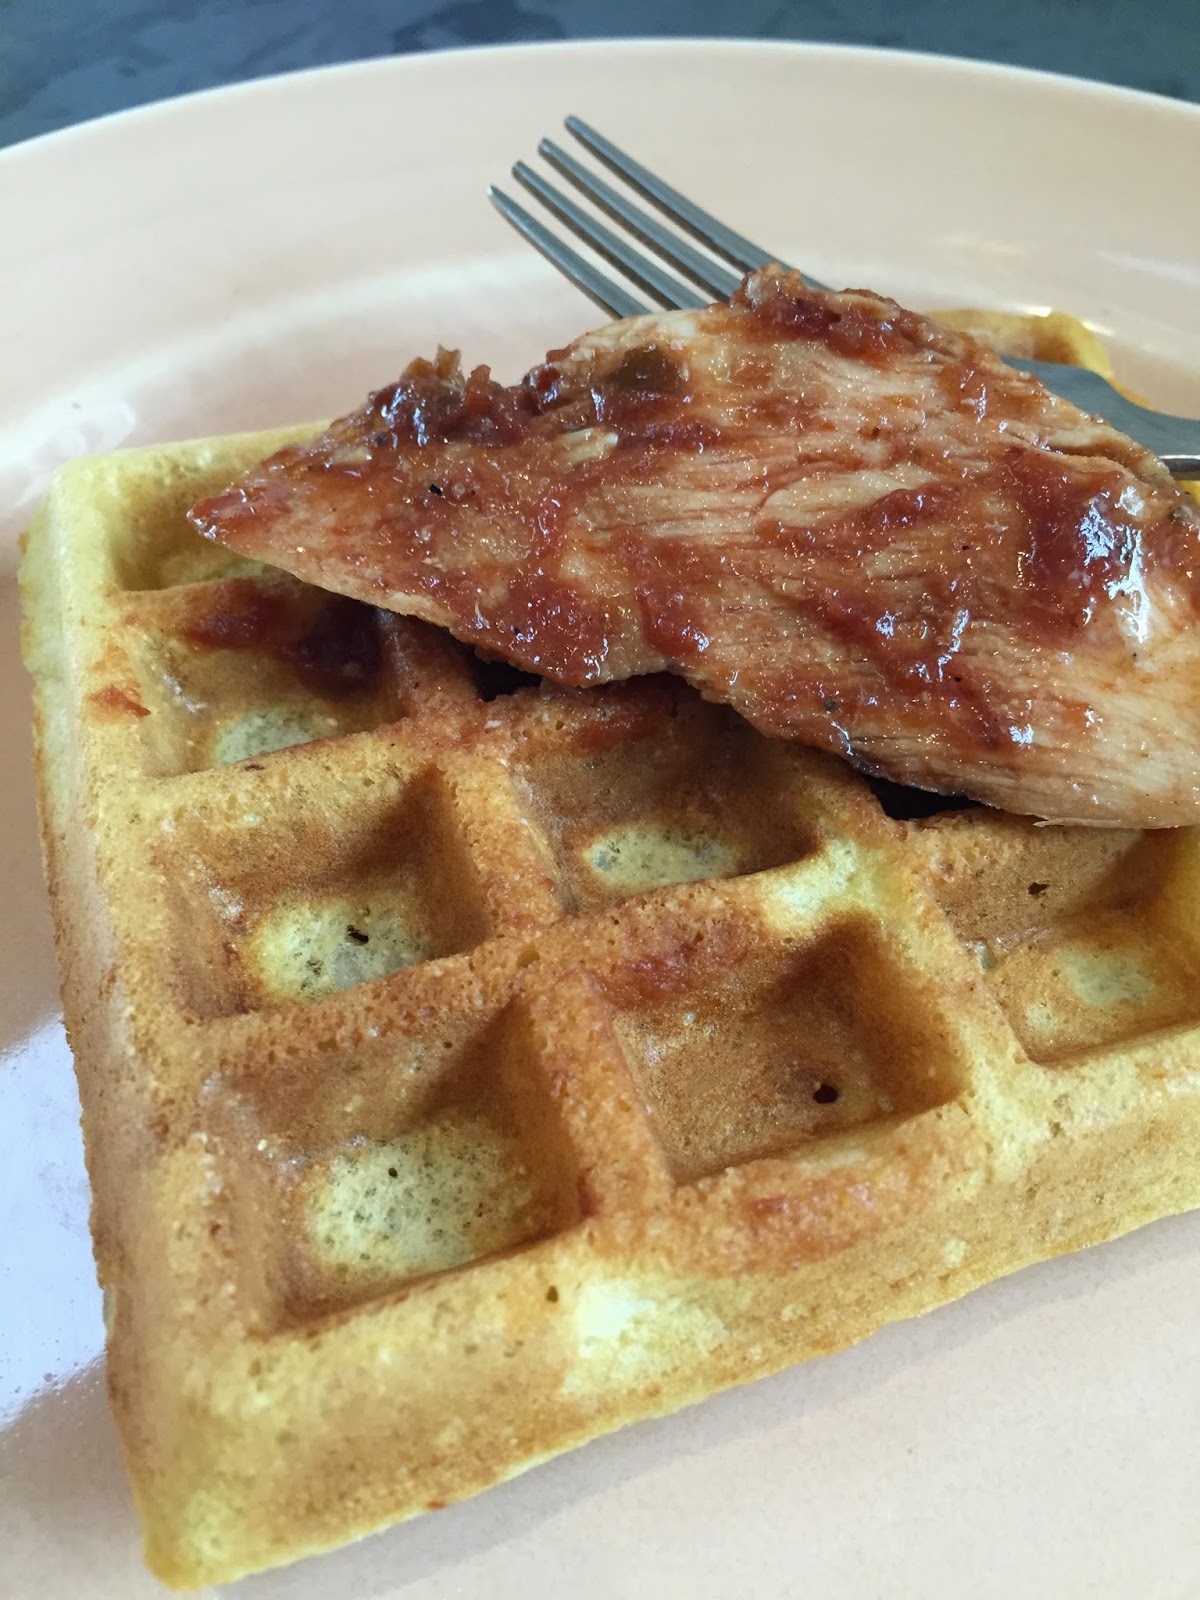
Sorry, but those ordinary waffles don't stand up to the ones we make here in the Potluck Paradise kitchens. Since we discovered these hearty cornmeal waffles from World War I wheat-stretching days, they are the only kind we make for breakfast AND as a superb base for leftover barbecued chicken. They are leavened with sour milk and baking soda, creating a light, and yet sturdy, treat.

The hearty rice and cornmeal texture is the tasty counterpoint to savory toppings. We're suggesting leftover barbecued chicken here, but they work equally well with creamed chicken, vegetables in cheese sauce, or even pork or beef stew. The pockets nicely hold sauces in place so you get deliciousness in every bite. The platform really makes the leftover bits of meat or vegetables go a long way to satisfy a hungry family.

Oh, yes.  They are tasty for breakfast as well. We frequently make a double batch and freeze the waffle squares. They toast up perfectly in the toaster. Just put it on low and toast them twice flipping them over in between.

Tasty World War I Rice and Cornmeal Waffles 

1 tablespoon vinegar
1 cup milk
1 cup cooked rice, cooled -- we prefer brown rice or even wild rice. White rice will work, just don't use the instant kind
1/2 cup cornmeal
1/2 cup flour
1 teaspoon baking soda
1/4 teaspoon salt, optional
1 tablespoon melted butter
2 large eggs, lightly beaten

Preheat your waffle iron. Put the vinegar in a glass mixing cup and add milk to the one-cup mark. Stir and set aside for about five minutes as it sours. In a medium mixing bowl combine the rice, cornmeal, flour, baking soda and salt if you are using it. Stir in the sour milk, mixing well to break up any lumps of rice. Stir in the melted butter and eggs. Cook waffles according to the directions of your waffle iron.

Makes about 6 4-inch "Belgian" waffle squares.

Copyright 2015 Rae Katherine Eighmey  All rights reserved

Tuesday, February 3, 2015

Preserve! Leftover Fruit

Cold and stormy winter days make us long for warm and delicious treats.  And one thing Potluck Paradise has taught us . . . adapting recipes can bring surprising deliciousness. Nothing proves this more than the Apple Preserve we developed for our book talk at the La Crescent Public Library. During our early summer tour through southwest Minnesota strawberry country, we demonstrated making 2 Ingredient, 2 Hour Strawberry Preserves. Now that we were heading into harvest and apple country, we wondered what would happen if we tried the same simple technique on apples.

Fabulous preserves!

Unexpectedly, but logically, the same preserving-sugar magic interaction that keeps strawberries whole, works with apple shreds. The resulting lusciousness is unlike anything we've ever had and is a new favorite. The McIntosh apples -- usually a variety that cooks into soft sauce, delicious spicy apple butter, or strains into clear jelly -- holds up perfectly. Pure sweet apple flavor, great on toast, yummy on ice cream or pound cake and wonderful on a ham sandwich.

It couldn't be easier. Or tastier. We gave a jar to a friend and her husband opened it. He said that it tasted like an unusually delicious honey, as he ate spoon after spoon. 

Amazing Apple Preserves

2 cups grated McIntosh apples
(grated on the large side of a box grater)
2 cups sugar

Mix apples and sugar and let stand for 2 hours or longer. Stir from time to time until sugar is dissolved. Put apples into a large saucepan, at least 3 quarts. Bring to a boil over medium heat. Lower heat and cook for 10 minutes, stirring from time to time. Store in refrigerator. Makes about 2 pints.  Store the finished preserves in the refrigerator for up to a month, or in the freezer for longer. 
NOTE: other varieties of apples may work just fine, but I have only tested this with the McIntosh and Gala, other apples should cook and preserve the same way. Worst case, you'll have a potluck preserve that resembles apple butter.  That's not terrible. 

Monday, February 2, 2015

February is National Potluck Month...Again


Start off National Potluck Month with 
Tasty "Top of my Head" Cornbread


Once again, we're declaring that February is National Potluck Month here at Potluck Paradise headquarters. It just seems so right to celebrate this shortest month where, at least in the northern states, the days get dramatically longer. What better way can there be to take joy in friends and family with homey foods that just bring people together. We're not ending this sentence with a question mark because the answer is obvious!

There are the February holidays, of course. The middle of the month is chock full -- Valentine's Day, Mardi Gras, Chinese New Year, and President's Day -- whew!  That will be some potluck!

This year we're also going to talk a bit about getting the most for your kitchen dollars. Yes, gas prices are down and we've not had to spend as much heating our homes as we did last year during the "polar vortex," but it never hurts to be penny wise and food-saving conscious.

We'll start the month off with a recipe we tossed together when we were in a rush, missing a starch to round out dinner, and couldn't find the exact recipe we remembered. This cornbread takes the best of a 19th-century version and makes it quick and delicious.  It is hardy and works nicely left over for breakfast, slightly warmed in a toaster oven or microwave with butter and maple syrup.

Top of My Head Cornbread

3/4 cup water
1/4 cup coarsely ground yellow cornmeal
1 cup regular cornmeal, white or yellow
1 teaspoon baking soda
1/2 cup flour
1 cup milk
2 eggs, lightly beaten

Preheat the oven to 400 degrees F. Lightly grease a glass baking pan about 7 x 11 inches. (Note other pans will work. Fill them only half full. Metal pans will bake faster)

Put the water in a small saucepan and bring to a simmer. Gradually stir in the 1/4 cup coarse cornmeal until well blended and smooth. Remove from heat and let stand about 5 minutes. In a medium mixing bowl, combine the regular cornmeal, baking soda and flour, mixing with a fork. Stir half the milk into the cooked cornmeal and then pour that mixture into the dry ingredients. Add the remaining milk and eggs. Mix well and spoon into the prepared baking pan.  Bake about 20 to 25 minutes until the cornbread just begins to pull away from the sides of the pan and a knife inserted into the middle comes out clean.  Delicious served with butter, honey, or preserves.


Copyright 2015 Rae Katherine Eighmey All rights reserved.